
Spring Cleaning Extravaganza – Kitchen
We’ve sped through the backstretch and are rounding the corner to the finish line in this final edition of our Spring Cleaning Extravaganza! We’re oh-so-close to a tidy, spotless, well-organized home that will allow us to embrace the spring season and be well-prepared for summer fun. Thus far our journey has made our windows and blinds sparkling and dust free, dust has been removed from every nook and cranny in our home, and our bedrooms have become beautiful, calm, clean, and relaxing havens, and our bathrooms are gleaming. Next, we’ll tackle what is arguably the most time consuming room in the house to clean – the kitchen – with our spring cleaning extravaganza – kitchen edition.
As always we’ll begin by assuming the usual suspects aka cleaning supplies.
SUPPLIES
- Baking soda
- White vinegar
- Sponge
- Bucket or large bowl
- Microfiber cloth
- Dawn dishwashing liquid
- Bar Keepers Friend
- Stainless steel cleaner
- Windex
- Paper towels
- Glass top stove cleaner
- Small scrub brush
- Non-scratch scrubbing pad
- Vacuum with attachments
- Swiffer dry and wet
- Potholders
THE CABINETS
- Empty cabinets and drawers. Do one section at a time.
- Vacuum accumulated dust, and dirt from the shelves and drawers.
- Dab a microfiber cloth with a mild cleanser. Wipe down the shelves and the inside and outside of the door. Use a clean toothbrush to treat the corners and other small crevices. Let dry completely before restocking.
- Wipe down cabinet hardware or remove knobs/handles and wash in hot, soapy water.
- Wash any storage bins, silverware trays, and drawer dividers and thoroughly dry.
- As you restock shelves and drawers, consider tossing any chipped or cracked items. Organize everything neatly. Toss any pantry goods, spices, and other foodstuffs that have expired or exceeded their shelf life.
THE BACKSPLASH
Some of us have some kind of tile between the counter and upper shelves; others have wall surface. Whatever you have, this space can get grimy and greasy from cooking and splattered during food preparations. Cooking is messy!
- Remove outlet- and switch-plate covers and place in hot soapy water. Wash, rinse, set aside to dry. If the covers aren’t too dirty/greasy, use an all-purpose cleaner and paper towel.
- Soften grease and grime with warm water, then clean with a sponge soaked in warm, soapy water, and finally dry with a dishtowel to avoid any leftover residue that would attract dirt and grime. For stubborn stains, use a baking soda spot treatment or a spritz of distilled white vinegar.
THE STOVE AND OVEN
Stovetop
- Remove control knobs and drip pans and soak in hot sudsy water.
- Use hot, soapy water to clean the stovetop and control panel. If your stove has a glass top, apply glass top cleaner with a soft cloth or sponge. Buff with a clean, dry, microfiber cloth.
- Shine all surfaces with Windex and a clean paper towel.
- Rinse and dry knobs and replace them on the control panel.
Oven
- Mix about 3 tablespoons of baking soda, a bit of water, and some white vinegar in an oven-safe dish until it forms a paste.
- Dab the dirtiest areas with the mixture.
- Place the remaining mixture in the center of your center oven rack.
- Turn the oven to around 212 degrees Fahrenheit.
- Leave the mix in for around 45 minutes.
- Turn the oven off and allow it to cool for a bit.
- Wipe down the oven with a wet sponge to easily remove build up. Rinse the sponge frequently.
- With a freshly rinsed sponge, use clean water to give the oven interior a final rinse.
Oven door glass
- Mix a paste of baking soda and water and apply a thick layer to the glass.
- Allow to sit for 20 minutes.
- Use a scraper to remove the crud.
- Wipe the glass with white vinegar to neutralize any remaining baking soda.
- With a freshly rinsed sponge, use clean water to give the oven interior a final rinse.
Oven drawer
- Empty the drawer and vacuum away all loose dirt and crumbs.
- Wipe clean with all-purpose cleaner and a paper towel.
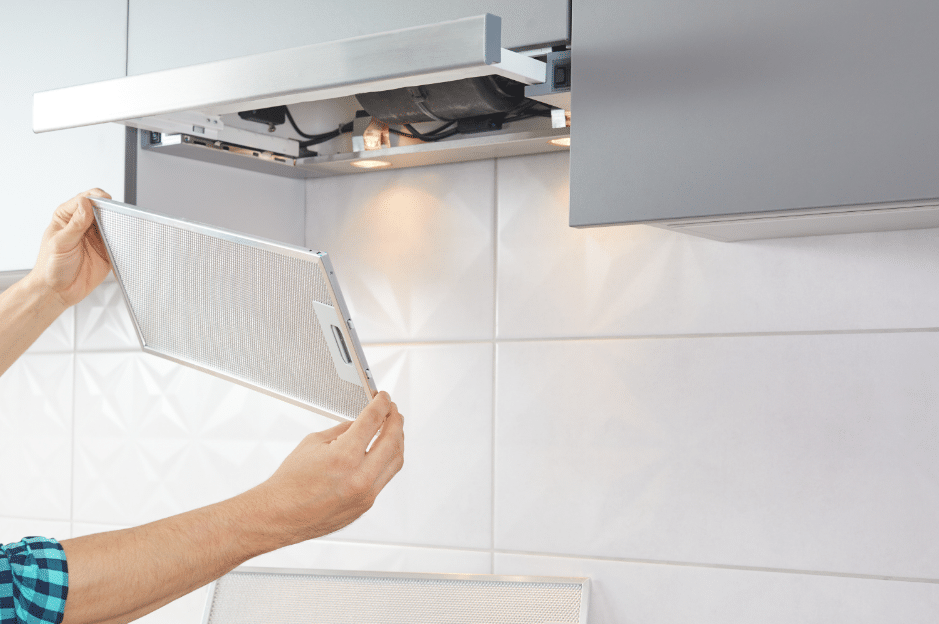
Vent hood
- Wipe it down with an all-purpose cleaner or hot soapy water.
- Remove vent filters and wash in hot soapy water. Rinse well. Allow to air dry before reinstalling.
Microwave
- Fill a microwave-safe bowl with two cups of water and two tablespoons of vinegar or freshly squeezed lemon juice.
Tip: Add a small wooden spoon to the bowl or place a toothpick in the mixture. This will allow bubbles to form against the wood as the water heats up, preventing the water from becoming superheated and “exploding” into a boil.
- Place the mixture in the microwave, close the door, and microwave on high for three minutes. Wait an additional 15 minutes without opening the door.
- Using potholders carefully remove the bowl from the microwave and set it aside—don’t pour it out just yet.
- Remove the turntable tray to wash it in hot soapy water in the sink.
- Dampen a clean microfiber cloth with the vinegar mixture and wipe down the interior of your microwave. Use a non-scratch scrubbing pad for any stubborn spots or hard-to-reach crevices.
- Spray an all-purpose cleaner onto a clean cloth and wipe down the control panel, sides, top, and bottom. (Never spray directly onto the control panel.)
THE FRIDGE
For a complete, in-depth how-to for cleaning your fridge, please visit to our blog post dedicated to that subject here. In a nutshell:
- Start at the top.
- Remove everything from a shelf and see just how messy you (blame the kids! Blame your S.O. Blame the dog!) have been.
- If there are spills, carefully remove the glass from the frame (or brackets, depending on your fridge) and clean both sides, as well as the edges, with the vinegar solution.
- Dry with paper or microfiber towels.
- Wash the frame that holds the glass before replacing the entire shelf. For that, I usually head to the sink and use dish soap and hot water.
- If there aren’t any caked-on spills that require shelf removal, simply run a scrubby sponge under hot water. Give the shelf and fridge walls an initial scrub to loosen any gunk. Then, spray it all down with cleaner and give it another scrub, before wiping everything clean with a microfiber cloth.
NOTE: When you’re not actively working in the fridge, close the door to keep everything as cool as you can.
- Remove the drawers and wash them in the kitchen sink with soap and water. If they won’t fit in your sink, spray them down, wipe them clean, and dry them before putting them back. While the drawers are removed, wipe down the walls and “floor” of the fridge with the vinegar cleaner. Use the same method for the shelves inside the doors.
- Wash down all items you removed from the fridge to clean it. Check all expiration dates and toss anything that’s expired.
- Use a clean microfiber cloth and vinegar spray to wipe down the outside of the doors, including the edges and seals, and don’t forget the handles! The worst area will undoubtedly be to top of the fridge as it tends to collect greasy residue from cooking and dust. I like keeping a kitchen towel on top that can just be thrown in the wash.
- Clean under the fridge.
- Vacuum the coils on the back of the fridge.
THE DISHWASHER
Filters
- If you have a removable filter, make a habit of regularly checking the cover at the bottom, underneath the twirling spray arm. Although the holes let food through, the filter is designed to block larger, harder debris. Cleaning is easy: just pick the pieces out by hand.
- If you have a removable filter, there is generally a circular piece at the bottom that can be turned when you want to clean the fine-mesh basket strainer underneath. The circular piece often fits into a flat piece of metal mesh with coarser holes that lifts out for cleaning.
- Clean each part by rinsing it out in the opposite direction from the way the water flows when the dishwasher is running. An old toothbrush or sponge can loosen debris, along with soaking in soapy water or vinegar. Once you’ve removed the mesh, clean the area underneath.
Air Gap
- The air gap is next to the sink, higher than the dishwasher, and has a liftoff cover. Below that is a part that’s plumbed to both the drain line from the dishwasher and a drain line that connects to the sink.
- Remove the cover and clean debris from the plastic part underneath.
Nozzles
- Clean nozzles on the spray arms by removing each arm (most dishwashers have upper and lower ones). Use a narrow wire, a pick, or sturdy needle to clean out the holes while running water thought the central opening on the arm.
Exterior
- A dishwasher usually cleans the interior on its own, but the exterior is up to you. You can never go wrong by simply wiping away food spatters with a soft, slightly damp cloth, then drying the surface with a second soft cloth.
GARBAGE DISPOSAL
The easiest job you’ll do all day!
- Sprinkle a half-cup of baking soda into the opening of the garbage disposal.
- Pour in a cup of white vinegar and allow it to sit for 10 minutes.
- Turn on the garbage disposal and allow hot water to rinse away the baking soda mixture.
- As an alternative to baking soda and vinegar, use chopped citrus peels.
- Pour in two cups of ice and a cup of salt, and then run the disposal to clean the blades.
- Using a soapy sponge, wash the disposal’s rubber splashguard (also known as a gasket or baffle).

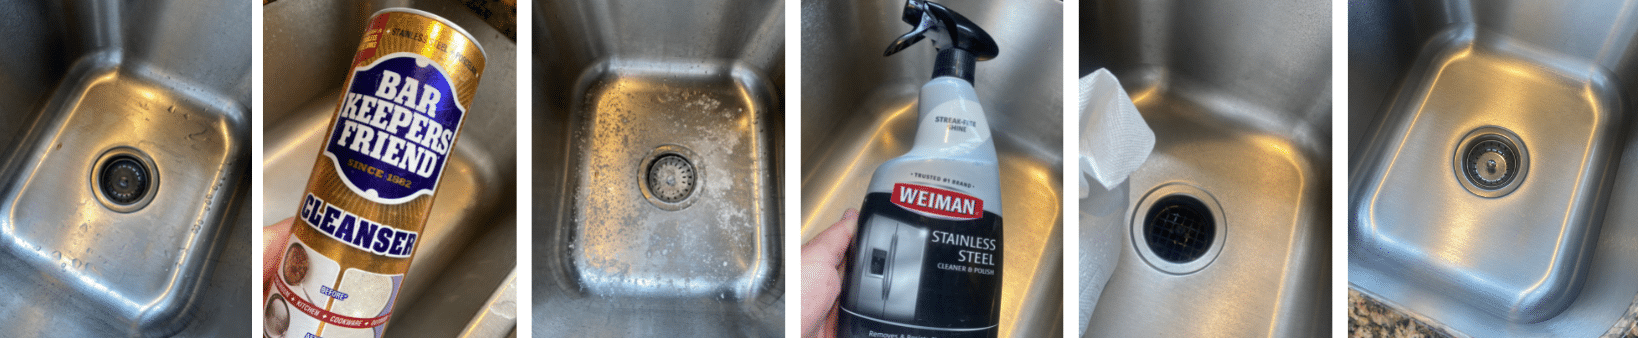
THE SINK
I always do the sink last as you’ll need it for every other step of the kitchen spring cleaning. There’s a clean sink and then there’s a sparkling clean sink. To me, the kitchen is not really clean unless the sink is gleaming. Follow these steps once a month to keep your sink looking like you have a maid. Before you get started, clean your dish drying rack. Place it in a sink full of hot, soapy water and give it a good scrub with your scrub brush.
- Generously sprinkle Bar Keepers Friend across the bottom of the sink(s).
- Use a sponge to scrub the walls and bottom of the sink, and the faucet. Get in the tiny space between the sink and the counter and in the openings to the drain and garbage disposal. Don’t forget to wash the sink drainer and disposal cover.
- Rinse with clear water.
- Use your sponge to blot up the water until the sink and faucet are just about dry.
- Spray with stainless steel cleaner.
- Polish with a dry paper towel or microfiber cloth.
COUNTERS
- Wash counters with hot soapy water or all-purpose cleaner. Then dry with a paper or cloth towel.
FLOORS
- If you have a washable rug, now is the time to wash and dry according to manufacturer’s instructions.
- Vacuum or sweep floors.
- Clean baseboards and any quarter round trim. A used dryer sheet works great in removing dust. Use soapy water and a sponge to remove any built-up dirt.
- Damp mop with Swiffer Wet or your mop and cleaning solution of choice.
And that, ladies and gents is that. We’ve crossed the finish line of our spring cleaning extravaganza with this kitchens edition. At least until the next person comes home with dirty shoes, leaves toothpaste residue in the bathroom sink, or is less than neat while making dinner. But that’s our wonderful, messy lives with the people we care about. At least deep down our home is clean – and with that – our minds clear of “must-clean clutter”.
Thanks for sharing this spring cleaning journey with me!