
I have a [rich] friend with an absolutely dreamy closet. It’s an entire room! The décor is all fresh, bright white and features a beautiful chandelier, make up table with a mirror featuring multiple light settings, comfy side chair, elegant floor-length mirror, shoe shelves, purse cubbies, and even a dress form to display her wedding gown. Did I mention the wine fridge stocked with bubbly? Like I said, dreamy. Living in a significantly more modest home, mine is just a wall closet with less-than elegant bi-fold doors which sometime jump off track. So dreamy is a bit out of reach. However, that doesn’t mean my closet can’t be beautiful – as in beautifully organized. Here’s how I turned my smallish, modest, messy closet into a clean clothes closet — beautiful, tidy, and well-organized storage for my clothes and shoes.
Remove Everything
I know what you’re thinking…..aaarrrggghhh!!! Same here. Took me a few weekends to work up the courage to turn a small messy closet into a huge messy pile of STUFF.
A good idea is to follow the advise of Sarah Giller Nelson, Professional Organizer and Owner of Less is More:
“Work in smaller blocks of time. Set a timer for 30 minutes to two hours, select a clothing type to go through and declutter until the time is up.”
Try it, it works (thank heavens).
Take out EVERYTHING, including hangers, and put it all on your bed. Now you can’t go to sleep until you finish the project, giving you no excuse to stop until you’re done. This will also give you a visual of the space available in your closet so you can see what will fit comfortably as you put back pieces you want to keep.
Vacuum and Dust
Tackle your now vacant closet with your vacuum and utilize its attachment to clean up dust webs and that black hole between the carpet and the wall where all manner of stuff collects. Then use your Swiffer duster to clean those top corners and the shelves. Leave the door open so the closet can air out.
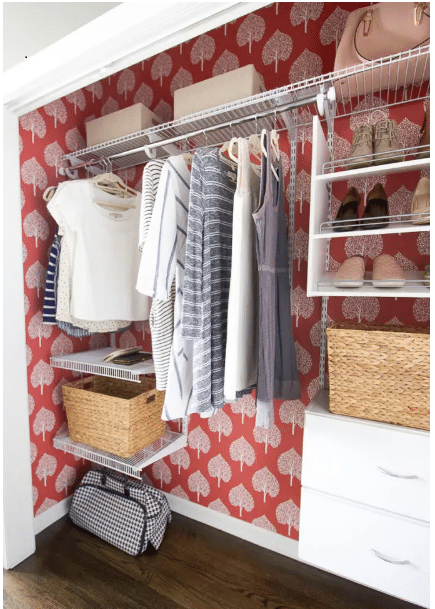
If you want to kick it up a notch, consider some beautiful peel and stick wallpaper and/or some motion-sensor strip lights. Here are the 10 best peel and stick papers and below is an example of a wallpapered closet.
Sort The Pile Into Four Groups
Once you’ve put an item into a pile, don’t second guess yourself! Keep going so you don’t lose momentum.
- Items you love and wear all the time. Again quoting Sarah Giller Nelson, Professional Organizer and Owner of Less is More:
“Hold your wardrobe to a very high standard. When we look good, we feel good, and you deserve to always feel your best. When decluttering, be very picky and honest.”
Try to avoid the temptation keep everything and thoughts like, “but it’s still good”! Here are some ideas to help you figure out what should stay in your closet.
- Layering pieces that are good for any season.
- Things you want and have actually worn in the last year.
- Clothing and accessories you can incorporate with any trend.
- Staple and everyday pieces that you wear seasonally.
How to Decide Which Clothes to Keep
If you’re still wondering, “what should I keep in my closet?” then answer the following questions:
- Would I buy this, or wear this, today?
- Does this fit my lifestyle?
- When was the last time I wore this?
- When will I wear this in the next few months?
Try the Marie Kondo Method. She asks:
“Does this item bring me joy?”
That’s the main question famous Japanese organizing consultant Kondo says to ask yourself when decluttering your closet. So, as you’re cleaning out your clothes, think about each item. Does a certain top make you feel less than your best? If it doesn’t make you feel good, you’re not going to wear it. There’s no point in letting it take up space in your closet.
Kondo also says to think about what you want to keep, not what you want to get rid of. Shift your thoughts to focus on items you truly love instead of worrying about some old clothes you don’t want.
- Damaged items. If you’re like me, you have a few garments in your closet that you’re hesitant to discard because you once loved them. But now you can’t wear them because they’ve shrunk, are pilled, torn, or faded. The zipper no longer works. A button is missing. There’s a food stain that just won’t wash out. These items can’t be donated because of their condition. Be brave and toss. All is not lost for these old faves though! Think recycle/reuse! Turn soft t-shirts in to polishing cloths, turn fleecy items into dust cloths.
- Maybe items. Try these on. So they look great on you? Do they still fit? Have you worn them in the last year? Put these clothes aside for two weeks. As Kristen Ziegler, Organizing Expert from Minima suggests:
“Be bold. Most people wear the same few items over and over, so just let the rest go.”
- Donate / Sell pile. Clothes in this pile should be in good, clean condition. There are many place where you can donate clothes, like Goodwill or Vincent DePaul. If the garments are work clothes, consider Dress For Success. Some organizations will even pick up donations from your home like Volunteers of America, and here are eight more! If you’d like to cash in on some of these clothes, you can bring them to a local consignment shop or sell online at a number of different places. For a how-to along with the five best online shops, visit NerdWallet.
Uniform Hangers
Not only will uniform hangers make your closet look uber organized, and become a clean clothes closet, they can also save space! And, new hangers don’t need to break the bank. I like flocked hangers as clothing doesn’t slip off. Think lightweight hangers for shirts, heavier for hang-able sweaters and blazers, skirt and pants hangers, and heavy duty hangers for jackets and coats. If space is at a premium, consider hangers that hold multiple pieces.
Sort by Category
Put all your shirts, pants, skirts, dresses, jackets together in groups. You can even sort by color so it becomes super-easy to locate particular garments. Store your clothes in a way that compliments your daily routine.
For example, if you work out every day, try putting athletic wear near the front of your closet with the items you regularly wear to work. Your more casual weekend clothes don’t need prime real estate because you won’t need to access them quickly as you’re rushing out the door during the week.
Five Fast Tips
Need more help creating a clean clothes closet? Still have questions about making decisions about the items you’re still unsure about?
- The One-Year Rule
Has it been more than a year since you’ve worn it? Then you probably won’t ever wear it. Don’t hold onto a T-shirt or a pair of shoes hoping you’ll use it again and don’t try to convince yourself you will someday. It’s time to let it go. Stop letting it take up valuable space.
- Force Yourself to Wear the Maybes
Wear clothes that you’re still on the fence about. How do you feel in them? Do they make you feel good? Will you ever wear it again? Can you find a way to style it?
- One Thing In, One Thing Out
From clean closet forward, get rid of something every time you bring something new home to help you prevent future clutter.
- The Hanger Trick
When you’re putting your clothes back in your closet, make sure all your hangers are facing the same way. After you wear an item, turn the hanger around when you put it back. Wait a month, then take note of which hangers are still facing the original way. Reevaluate your need for these clothes and consider donating them. This will help you keep your closet clutter in check.
- Slow and Steady
If the idea of spending several hours cleaning out your closet to make a beautifully clean clothes closet is just too overwhelming, try making it part of your daily routine. Set up a donation box in or near your closet and aim to put five items in every day.
Hopefully, this leads you to a less cluttered and more organized closet. Hoping it leads me to getting rid of “good” suits I bought for work years ago that haven’t been out of the closet in ages. I am most certainly afflicted with the “but it’s still good!” mentality. Working on changing that to “it’s still good – for someone else.”
Now back to dreaming of a beautiful, clean clothes closet large enough to hold a wine cabinet full of bubbly…
